
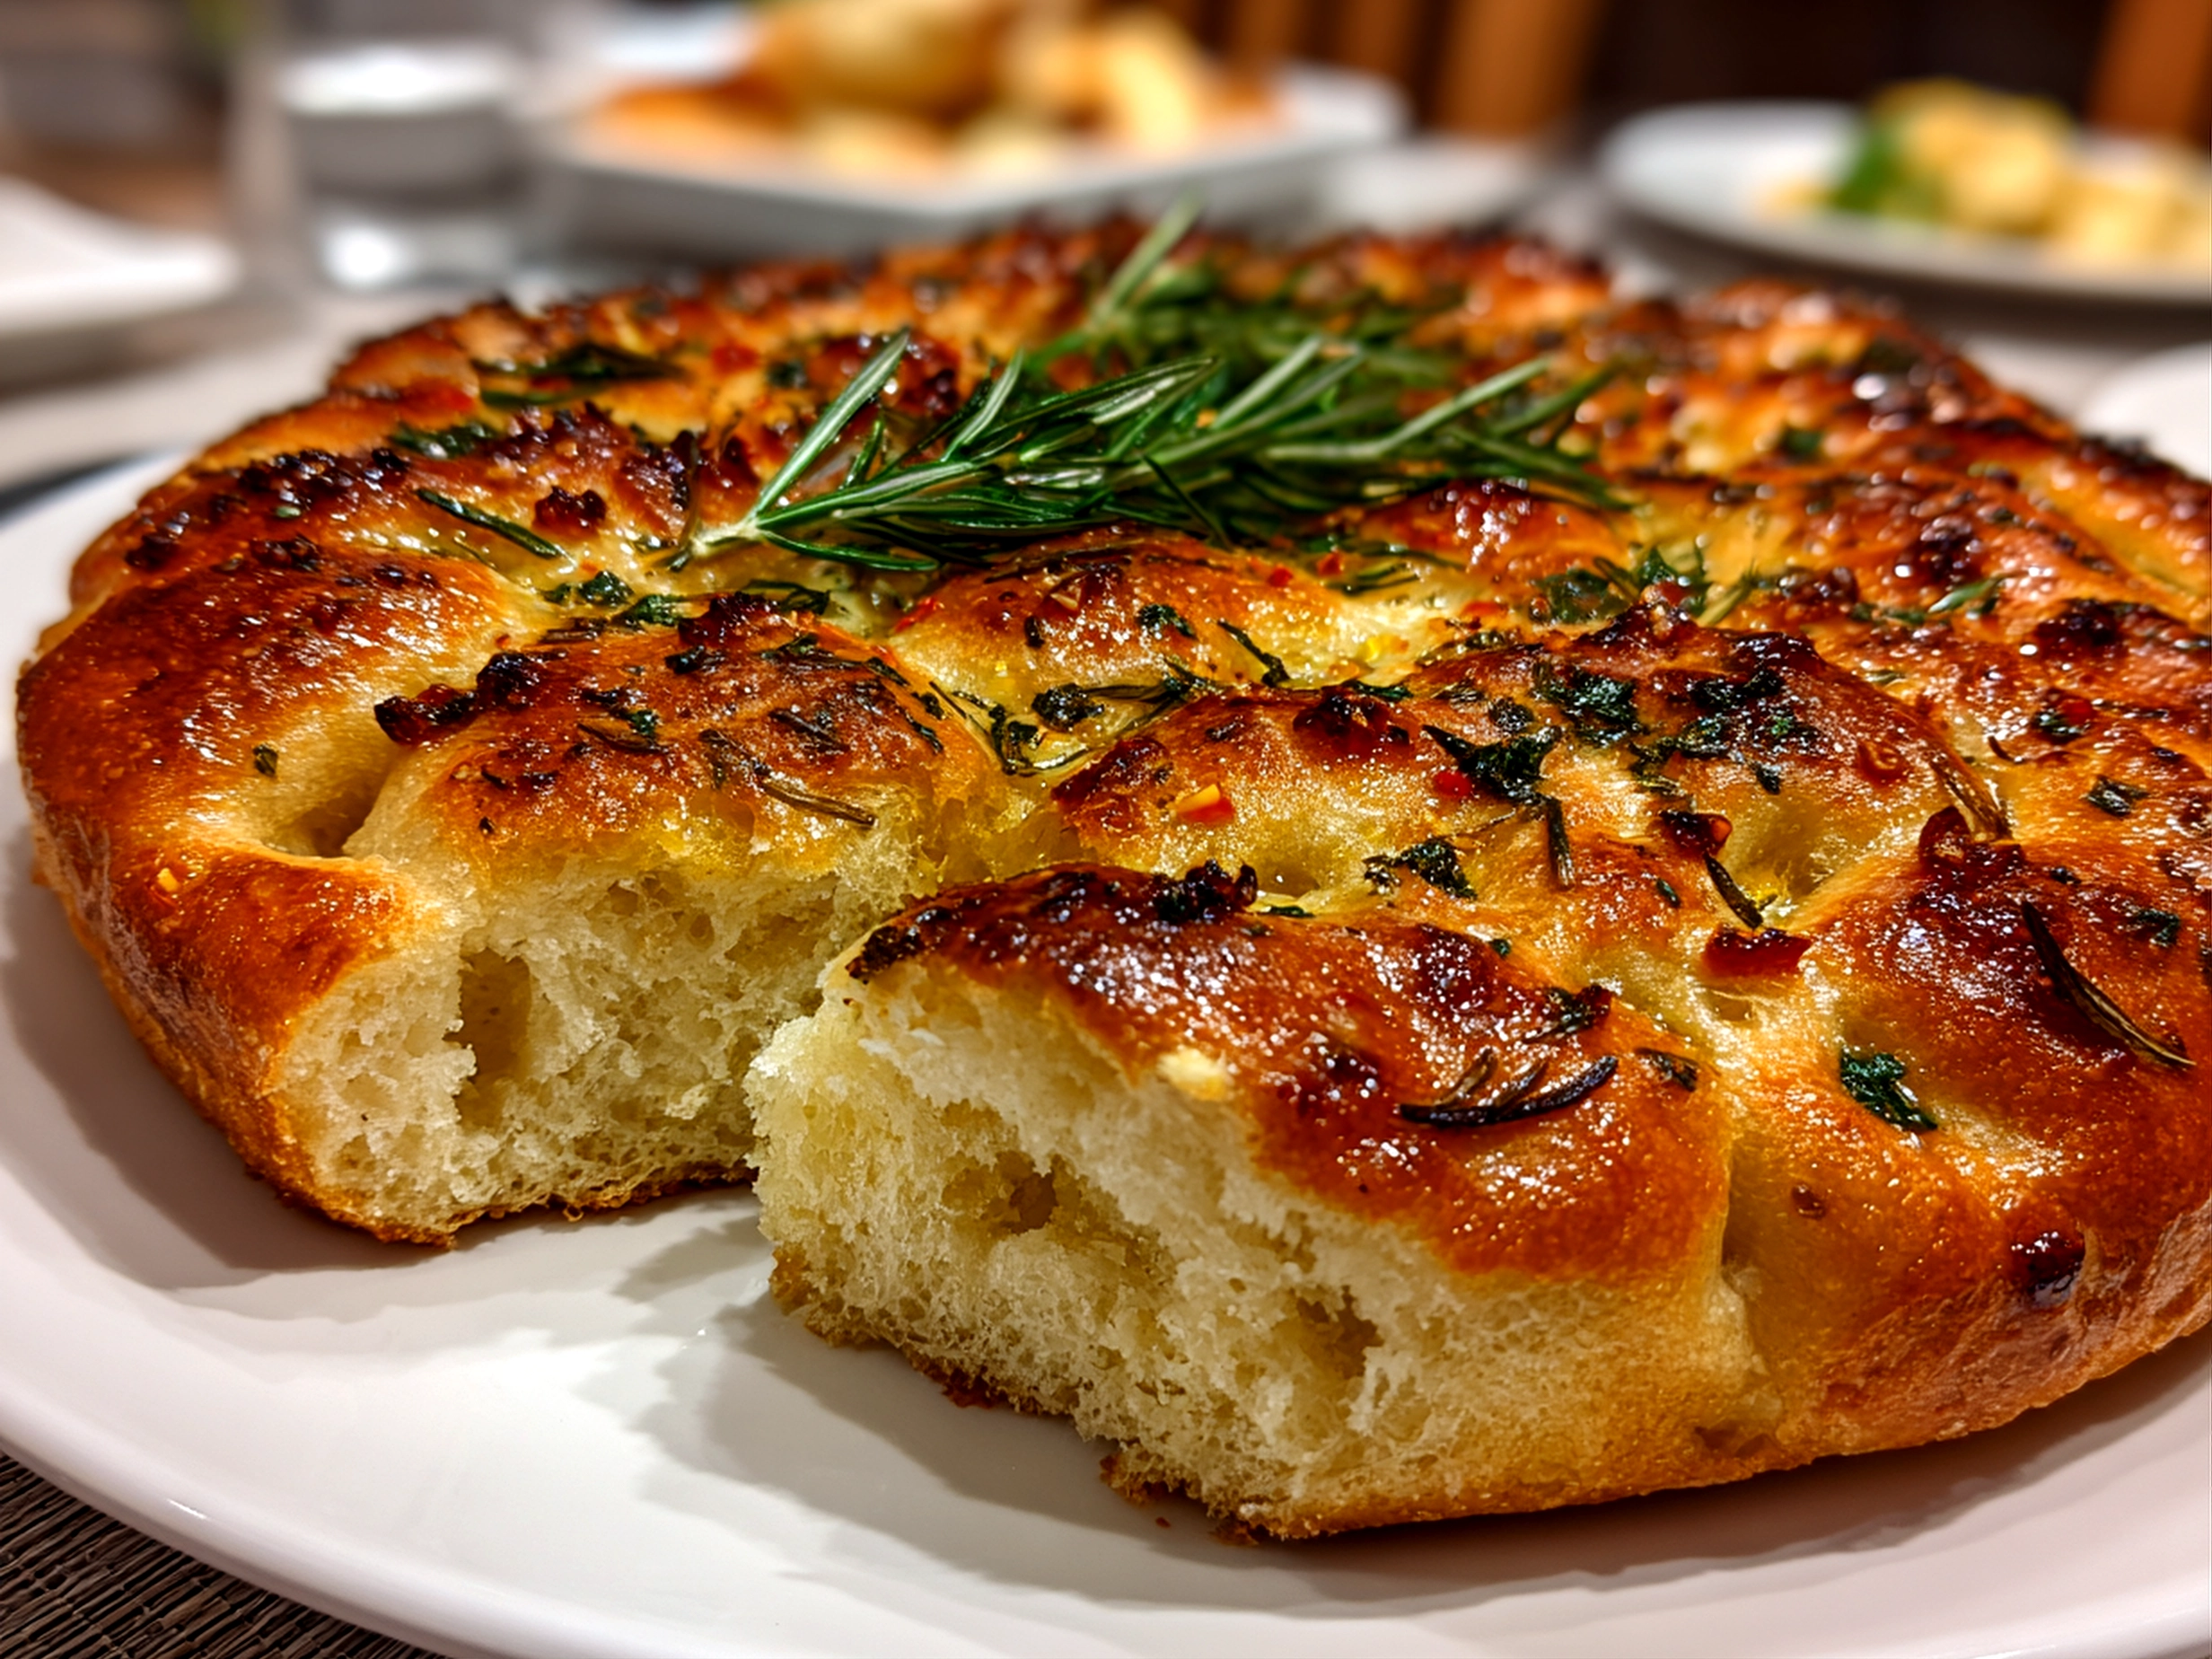
I still remember the moment I first tasted a Focaccia Decorative Loaf. It was at a small Italian bakery tucked away on a charming street during a family trip. The aroma hit me before I even saw it—herbs, olive oil, and fresh bread warmth that felt like a cozy hug. What truly surprised me was how the focaccia wasn’t just about taste but also a feast for the eyes. The herb focaccia patterns were so artfully done, each leaf and swirl inviting me in for a closer look. That beautiful Italian flatbread decoration made the loaf feel special, transforming a simple bread into a centerpiece.
This Focaccia Decorative Loaf quickly became more than a treat—it felt like a story on our table, something that brought people together with smiles and conversation. It perfectly matches my philosophy of approachable, comforting meals that everyone can enjoy. No intimidating techniques or fancy equipment needed—just a bit of creativity and patience.
Since that day, I’ve been developing my own versions of this shaped focaccia bread, exploring artisan bread scoring techniques and decorating with herbs to create inviting patterns. Sharing this recipe feels like sharing a piece of those happy moments, where food brings warmth and connection. I’m so excited to guide you through making your own Focaccia Decorative Loaf, one that will fill your kitchen with delicious smells and your table with joy. Let’s turn simple ingredients into something truly memorable!
For anyone who loves combining flavor with a touch of creative fun, this focaccia decorative loaf will be a delightful journey. If you enjoy recipes like this, you might want to check out another comfort food favorite: Jam Donut Focaccia Delight. It’s another way to make focaccia bread design exciting and tasty!
Ingredients
Here’s your list for making this beautiful Focaccia Decorative Loaf. This ingredient selection is simple but brings out cozy, satisfying flavors every time.
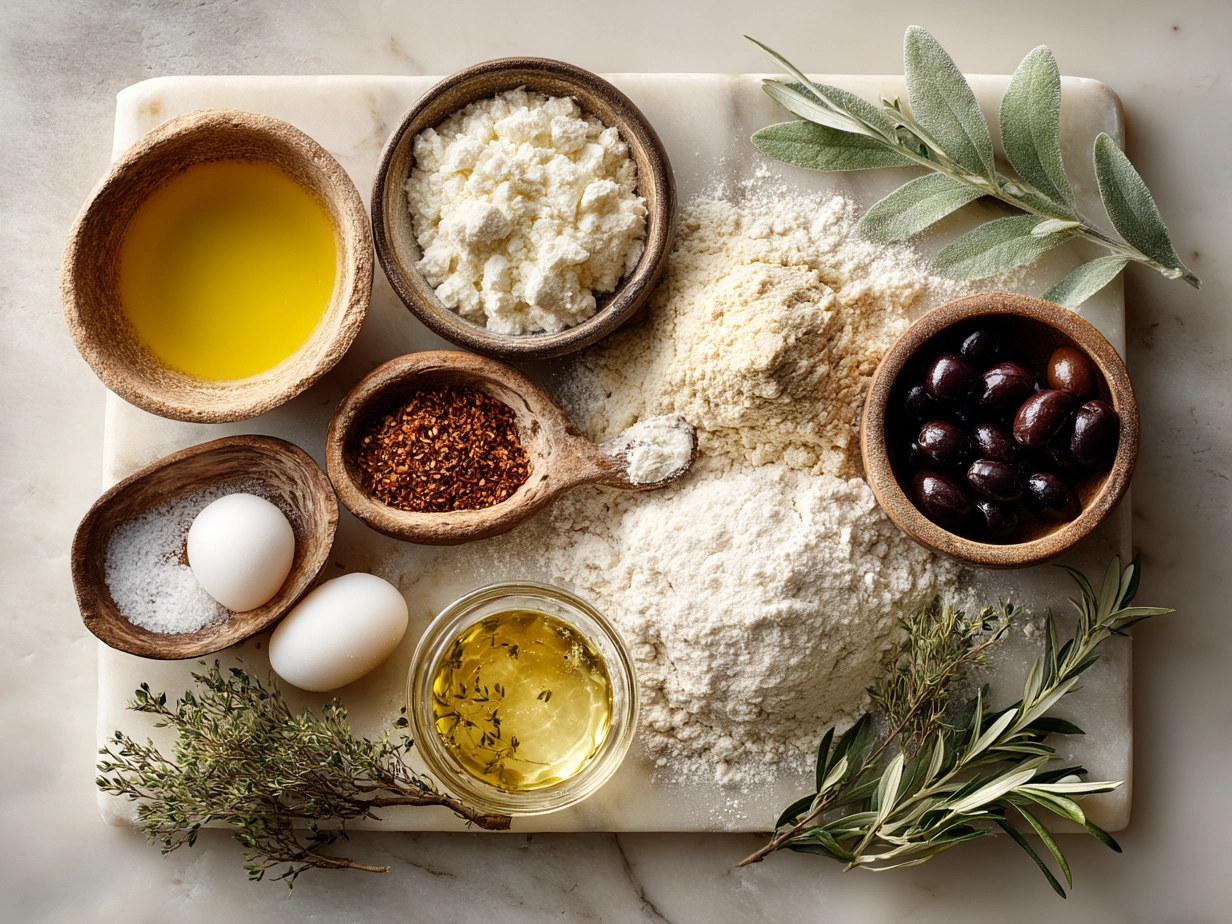
- 3 ½ cups all-purpose flour (the foundation for soft, tender bread)
- 1 packet (2 ¼ tsp) active dry yeast (for that perfect rise)
- 1 ¼ cups warm water (about 105°F, not too hot for your yeast)
- 2 tsp kosher salt (balances flavor without overpowering)
- ⅓ cup extra virgin olive oil, plus more for drizzling (the secret to moistness and richness)
- Fresh rosemary sprigs and thyme (for herb focaccia patterns that smell amazing)
- Coarse sea salt, for topping (adds a crunchy finish that bursts with flavor)
I like using good-quality extra virgin olive oil—it’s my go-to upgrade that makes the Focaccia Decorative Loaf taste special. You’ll find excellent oils at your local farmers’ market or specialty grocery stores.
If you prefer, you can swap rosemary for sage or oregano. These herbs work beautifully for Italian flatbread decoration and give your shaped focaccia bread a personal touch. For gluten-free options, a blend of gluten-free flours with xanthan gum can give good results, though the texture will differ slightly from the traditional loaf.
Keep your yeast fresh! Store unopened yeast in the fridge or freezer to maintain its power. Fresh herbs for roof focaccia bread design patterning are best washed and dried just before use so they stay vibrant and don’t wilt.
If you want to try a sweeter version, drizzling some honey on top before baking adds a lovely glaze that contrasts beautifully with the coarse salt and herb focaccia patterns.
For more inspiration on herb focaccia patterns, check out this How To Make Focaccia Bread Art With Vegetables + Herbs tutorial. It’s a fantastic resource if you want to try additional Italian flatbread decoration styles.
Let’s Make This!
1. Warm your water and stir in the yeast. Let it activate until it’s frothy, about 5 to 10 minutes. You want the yeast alive to get that perfect rise in your Focaccia Decorative Loaf.
2. In a mixing bowl, combine the flour and salt. Add the yeast mixture and ⅓ cup of olive oil. Mix until the dough starts to come together.
3. Turn your dough onto a floured surface and knead for about 8 to 10 minutes until it’s smooth and elastic. Don’t worry if it feels sticky at first; a little patience here leads to a beautiful crumb.
4. Place the dough in a lightly oiled bowl, cover with a clean kitchen towel or plastic wrap, and let it rise in a warm spot until doubled in size—usually about 1 to 1 ½ hours in my kitchen.
5. Once risen, gently press the dough onto a well-oiled baking sheet to form a rough rectangle or oval shape. Here’s a helpful tip: use your fingers to create dimples all over the surface. This classic artisan bread scoring helps hold the olive oil and herbs in place while baking.
6. Drizzle extra olive oil generously over the dough, then arrange your fresh rosemary and thyme sprigs in decorative herb focaccia patterns. This is where your Focaccia Decorative Loaf transforms into something truly special. The pattern ideas can range from spirals to leaf shapes or even little flowers. For inspiration, check out these beautiful How to Make Decorated Focaccia Bread examples.
7. Sprinkle coarse sea salt over the top. Cover the dough loosely again and let it rest for another 30 minutes to rise slightly.
8. Preheat your oven to 425°F (220°C). Bake the Focaccia Decorative Loaf for 20 to 25 minutes. You’re looking for a golden crust with a soft interior. When it smells fragrant and the edges look crisp, your bread is ready!
9. After baking, give a final brush of olive oil over the top to keep the crust tender and shiny.
Remember, the key to success is gently handling your dough and letting time do its magic. This step might seem tricky when creating intricate herb focaccia patterns or artisan bread scoring, but I promise your Focaccia Decorative Loaf will come out beautifully.
While it bakes, enjoy that amazing aroma filling your kitchen—it’s one of those comforting moments!
If you want to keep exploring other ways to shape and decorate focaccia bread, this inspiring Facebook group post shares homemade maple bars and focaccia bread recipes that include clever shaping ideas: Homemade maple bars and focaccia bread recipes.
Serving & Presentation
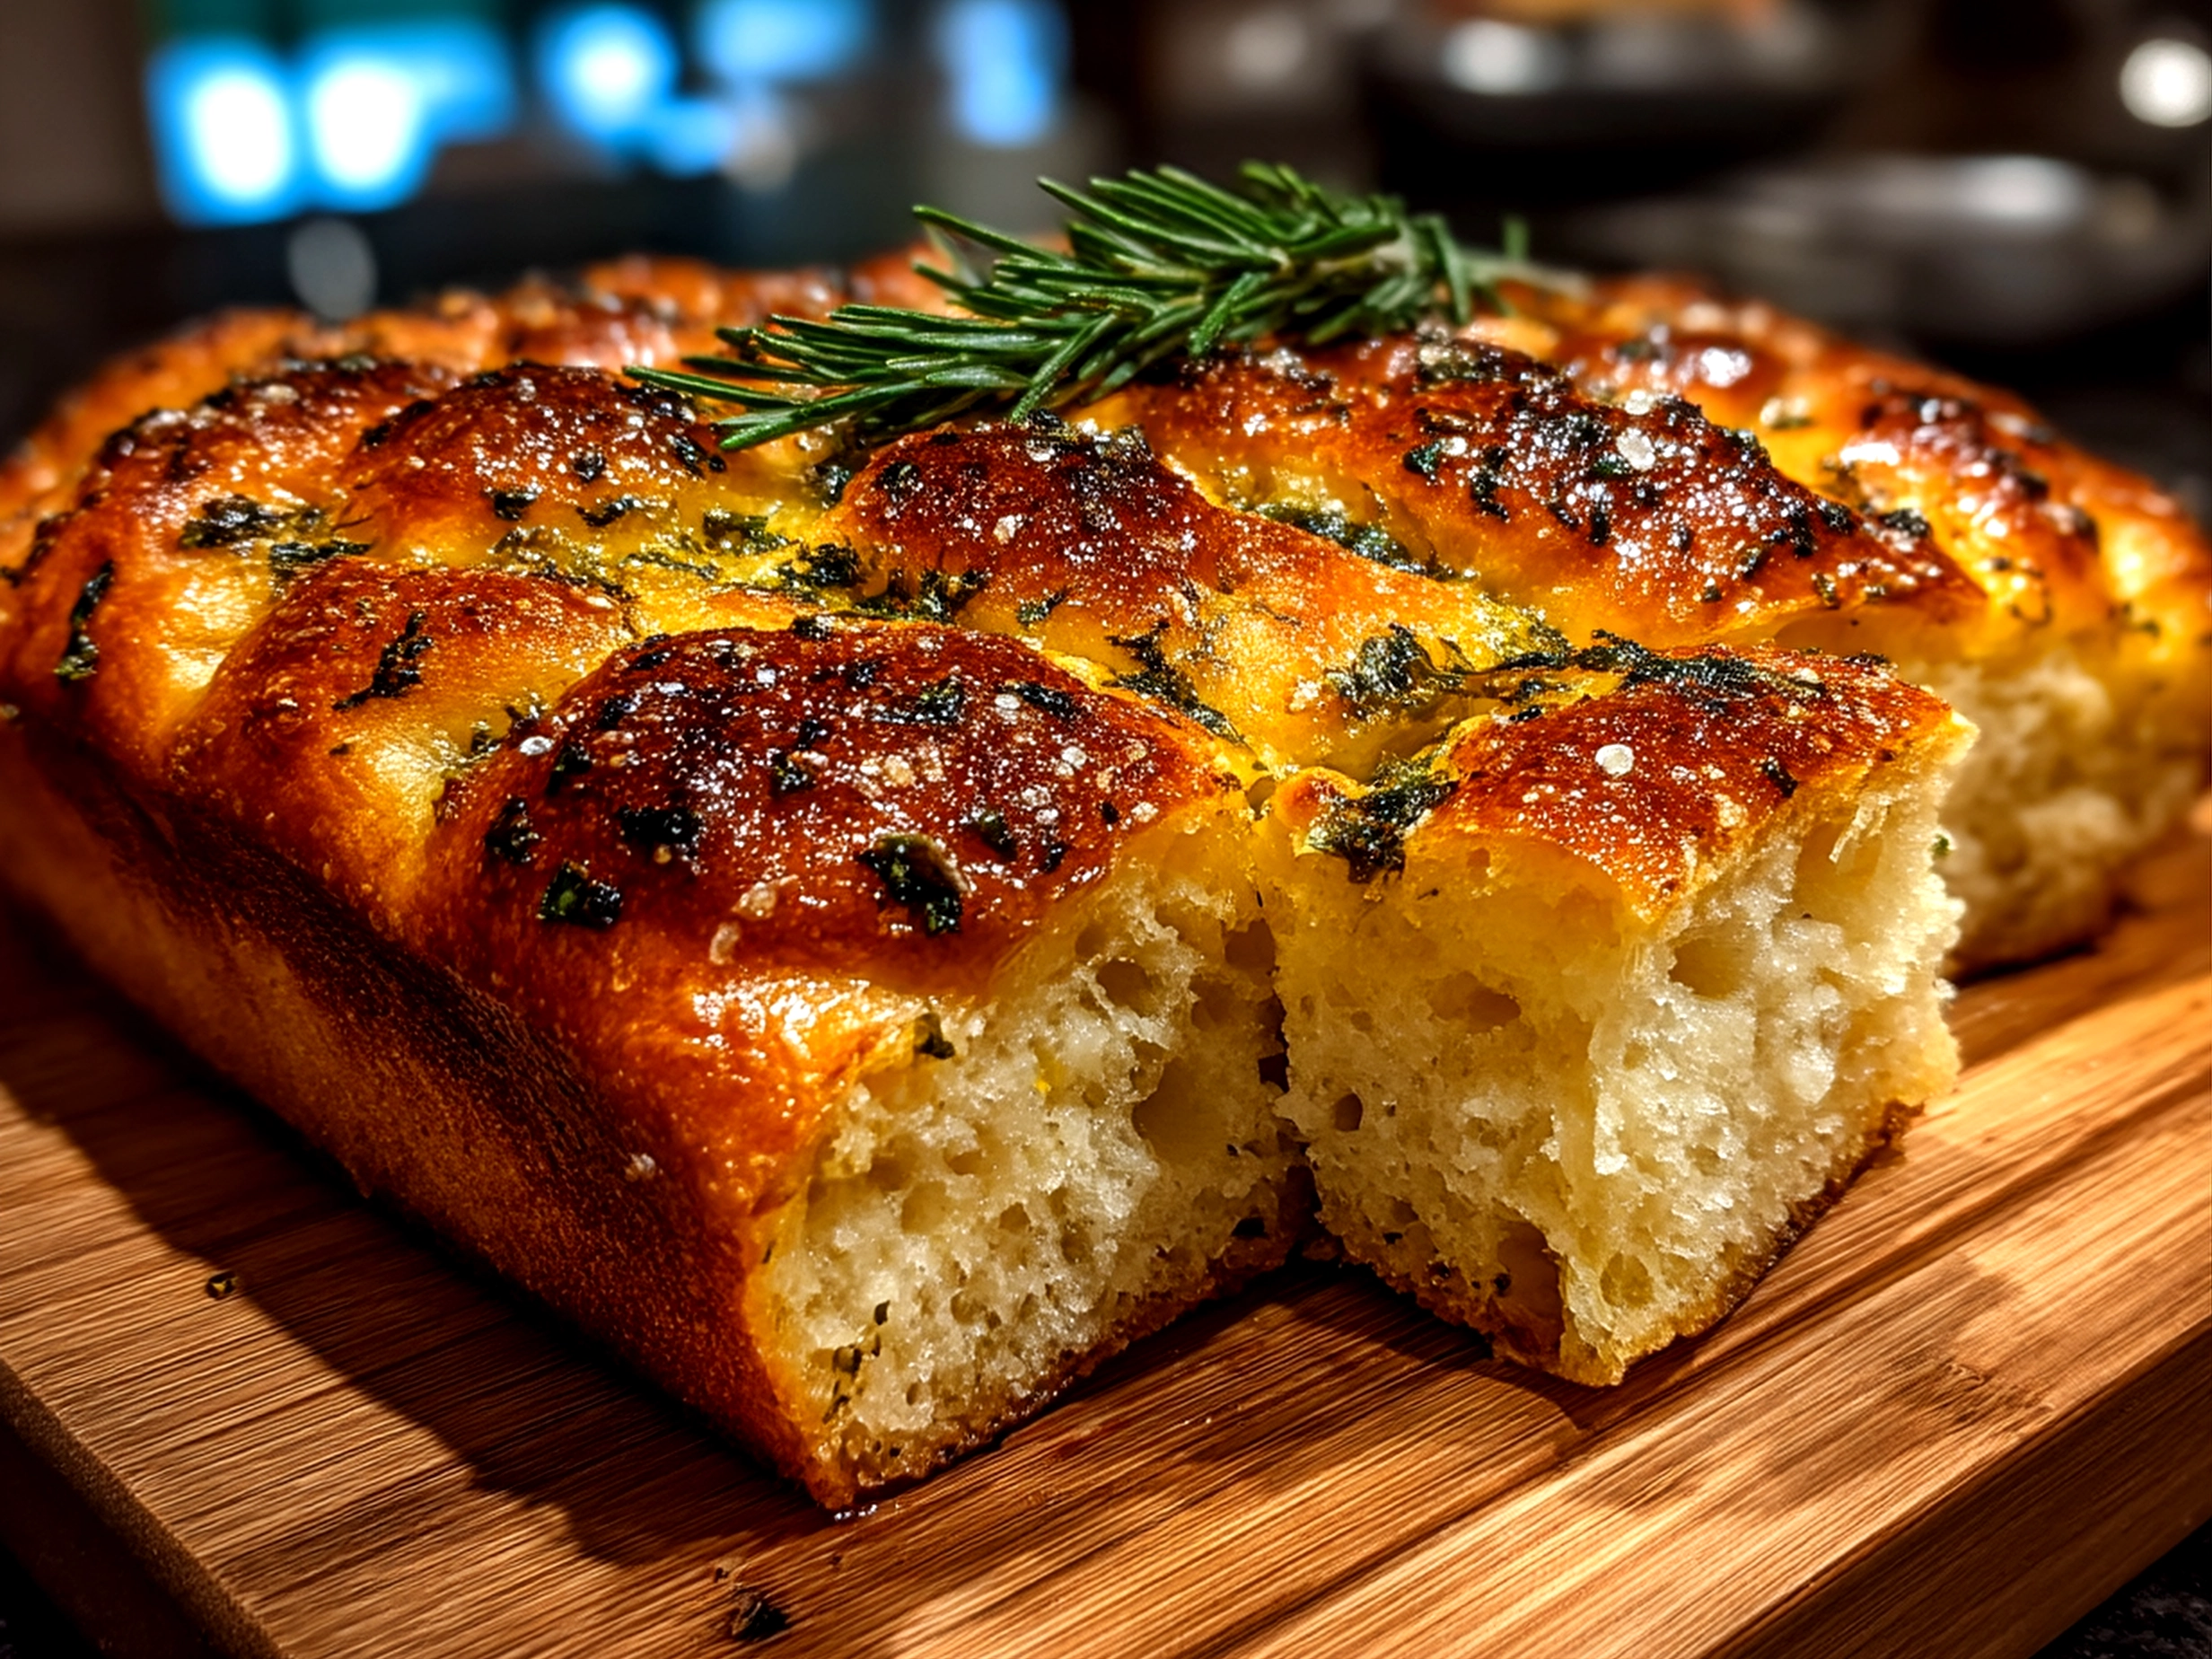
Serving this Focaccia Decorative Loaf is as fun as making it. The rustic, golden loaf with delicate herb focaccia patterns instantly invites smiles. I like presenting it on a wooden board alongside simple bowls of good olive oil and balsamic vinegar for dipping.
This loaf shines at casual gatherings, family dinners, or special brunches. Each piece pulls apart easily, showing off the soft crumb beneath the crisp crust. When people see the shaped focaccia bread with those painted herb designs, it sparks conversation and amazement—plus, it tastes wonderful!
Pair it with fresh salads, cheeses, or even alongside roasted vegetables or soups. I’ve also found that this Focaccia Decorative Loaf works beautifully with antipasto platters, making your spread feel thoughtful and homey.
A beautiful, quick plating tip: Toss extra rosemary sprigs on the serving board for a touch of green and aroma. Leftovers taste great the next day toasted with a little garlic butter—a simple way to enjoy every crumb.
For seasonal variations, adding thin slices of heirloom tomatoes or olives before baking changes both the flavor and the appearance. I’ve had so much fun experimenting with these ideas.
If you love this focaccia decorative loaf recipe, you’ll appreciate the comforting joy of my other treasured bread recipes, like the Jam Donut Focaccia Delight—a playful twist that’s perfect for celebrations.
FAQs
1. Can I make this Focaccia Decorative Loaf ahead of time?
Yes! You can prepare the dough the night before and let it rise slowly in the fridge. Just bring it to room temperature before shaping and baking. Making it ahead gives the flavors extra depth.
2. What if I don’t have fresh rosemary or thyme?
Dried herbs can work, but fresh herbs give the best aroma and beautiful visual herb focaccia patterns. If you only have dried, sprinkle them lightly after you’ve drizzled the olive oil.
3. How do I know when my Focaccia Decorative Loaf is perfectly done?
Look for a golden-brown crust, firm edges, and a fresh bread aroma. The loaf should sound hollow if you tap the bottom. Don’t rush baking—this ensures the inside stays soft and moist.
4. Can I make shaped focaccia bread without dimpling?
The dimpling helps hold the oil and seasonings in place, but you can skip it for a smoother look. Just be sure to drizzle plenty of olive oil so it stays moist.
5. How do I get the herb focaccia patterns to stay vibrant and not burn?
Arrange herbs on top gently and bake at 425°F. Since baking time is short, fresh herbs should stay colorful. You can also add herbs halfway through baking for extra freshness.
6. Is this Focaccia Decorative Loaf suitable for beginners?
Absolutely! Although the artisan bread scoring and decoration add flair, the basic dough is forgiving. Take your time, and your kitchen will soon smell amazing.
7. What’s the best way to store leftover Focaccia Decorative Loaf?
Wrap it in a clean kitchen towel or store in an airtight container at room temperature. Consume within two days for the best texture. Leftovers also toast beautifully.
If you want some delightful variations on how focaccia can look and taste, check the community’s ideas in Homemade maple bars and focaccia bread recipes. They’re full of creative energy and inspiration.
Why This Focaccia Decorative Loaf Will Become Your New Favorite
This Focaccia Decorative Loaf captures everything I believe about home cooking—approachable, comforting, and beautiful. It turns simple ingredients into a ceremony of shared moments around the table, pairing visual delight with cozy satisfaction.
My Focaccia Decorative Loaf Success Tips:
- Always let your yeast bloom for that perfect rise every time.
- Don’t rush the dough’s rests; each rise deepens the flavor and texture.
- Be generous with high-quality olive oil—it makes the crust tender and rich.
I’ve created versions with caramelized onions nestled among the herb focaccia patterns, another with olives and sun-dried tomatoes, and a sweet twist with honey and lavender. The olive and sun-dried tomato version tends to get the most smiles at my gatherings.
I invite you to make this Focaccia Decorative Loaf a regular in your kitchen. It’s a recipe that welcomes creativity, brings warmth, and lifts any meal into a shared celebration. I have every confidence you’ll enjoy your delicious, beautiful results.
Once you try it, please share your photos and stories—I love seeing how fellow food lovers bring comforting recipes to life! And if you want to add a sweet twist to your baking repertoire, don’t miss the unexpected joy of the Hidden Heart Chocolate Loaf Cake—it’s a keepsake recipe from my kitchen to yours.
Happy baking and joyful moments ahead!
Focaccia Decorative Loaf

This beautifully decorated focaccia loaf features a soft, airy crumb topped with fragrant herbs and olive oil, perfect for an elegant appetizer or side dish.
- Prep Time: 15 minutes
- Cook Time: 25 minutes
- Total Time: 1 hour 40 minutes
- Yield: 8 servings
- Category: Dinner
- Method: Baked
- Cuisine: Italian
Ingredients
- 3 ½ cups all-purpose flour
- 1 packet (2 ¼ teaspoons) active dry yeast
- 1 ¼ cups warm water (110°F to 115°F)
- 2 tablespoons olive oil, plus more for drizzling
- 1 teaspoon sugar
- 1 teaspoon salt
- Fresh rosemary sprigs, for decoration
- Cherry tomatoes, halved, for decoration
- Coarse sea salt, for sprinkling
Instructions
- In a small bowl, dissolve yeast and sugar in warm water. Let stand until frothy, about 5 minutes.
- In a large mixing bowl, combine flour and salt. Add yeast mixture and 2 tablespoons olive oil. Stir until a dough forms.
- Turn dough onto a floured surface and knead for 8-10 minutes until smooth and elastic.
- Place dough in an oiled bowl, cover with a damp towel, and let rise in a warm place until doubled in size, about 1 hour.
- Preheat oven to 425°F (220°C). Punch down the dough and transfer to a greased baking sheet. Press and stretch it into a roughly 12×16 inch rectangle.
- Using your fingers, create dimples all over the surface of the dough. Drizzle olive oil generously over the top.
- Arrange fresh rosemary sprigs and halved cherry tomatoes decoratively on the dough. Sprinkle with coarse sea salt.
- Let the dough rest for 15 minutes to rise slightly again.
- Bake for 20-25 minutes or until golden brown. Remove from oven and let cool slightly before slicing.
Notes
For an extra flavor boost, brush the focaccia with garlic-infused olive oil immediately after baking.